Showing posts with label German Armor - WWII. Show all posts

Monday, October 6, 2008

Tiger 1 Late Production - Completed

Hi folks!
My Tiger 1 completed...Finally. Will share with you guys the weathering process after i'm back from reservist...in a month's time...

Cheers!


Wednesday, September 3, 2008

Work-in-Progress - Tiger 1 Late

Hi folks!
More in-progress pics of my Tiger.

Here's the base coat applied to the entire vehicle including the tracks. Just to note, everything is assembled (except the clear periscope lenses) prior to the paint job. The combination i used for this shade is yellow (H313) + small amts of Sandy Brown. Gives it a more sandy look.


From here on, i started to apply the camouflage pattern using Red Brown. This was applied free hand with my airbrush. Had to tune the nozzle to almost the finest to create the fine camouflage patterns. My 1st attempt at this. This model jus keeps getting more challenging...


Some close up shorts of the camo pattern.
Now the tracks are finally painted. Color used is Tire Black. Looks very "clean" huh. Well all these is the pre-weathering stage; it'll look very different after weathering. As this is a WWII subject, i'll be doing quite a substantial amt of weathering in the coming wks...
Notice too the "Post-shading" technique carried out along the edges of the side panels and along the corners. 1st step in creating the 3D effect.
How were the tracks painted while on the vehicle?
Firstly i generally airbrushed the tracks color onto the tracks, inevitably some parts of the roadwheels were sprayed on too with the tracks color, but no worries, this will up touched up later. After the main bulk of the tracks was covered. I sprayed back the base coat color of the tiger onto the roadwheels. The remaining portions of the tracks not covered by the airbrush were subsequently handpainted. Doesn't matter if the tracks are only abt 90% painted as they will eventually be heavily weathered.


Next steps would be:
  1. Detailed painting of the tow cables, pioneer tools on the tank, etc.
  2. Application of the gloss coat on the entire tank.
  3. Application of decals.
  4. Weathering...Details at a later stage in a step-by-step process...

Cheers!:)
Brandon

Sunday, August 24, 2008

Tiger 1 Late - Building completed!

Hi folks!
Latest update to my Tiger 1 proj after about 2 mths... I've completed the construction phase...Will be moving onto the painting phase, dats where e fun begins.. This has indeed been a challenging model to deal with...does help to improve my building skills, especially with photoetch (the metal parts on the model)....The saying dat models produced by Dragon seem to always be over-engineered...I truely agree...

I had to use individual track links to construct the tracks as the original rubber ones in the kit were too long...rather a disappointment with Dragon's technology.."


Everything assembled! created some damages to the track fenders to represent battle-damage


This is the Tiger 1 after a layer of primer added.


Now it's ready for painting...Once the 1st layer of paint is on..will post some pics..sometime next wk ba...
Cheers!
Brandon..:)


Friday, June 20, 2008

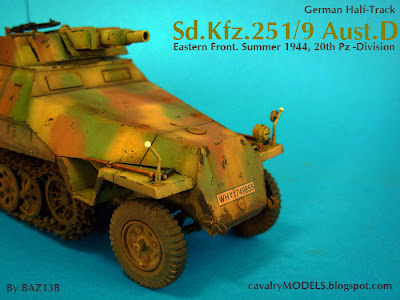
Sd.Kfz.251/9 Aust.D - German WWII Half-track

Hi guys...
Another update on my earlier projects. A Half-track vehicle that was used during WWII by the Germans.

Do vist my gallery for more pics.

Cheers!
Brandon

Monday, June 16, 2008

Work in progress - Tiger 1 Late Version (German WWII Tank)

Hi guys!
I'm back on my projects once again...Just 2 weekends ago, started on my Tiger 1 Late version... As you can see from the box art below... A bit of brief...This is a German World War II tank, a classic model that every modeller has to build someday somehow...a rather challenging kit...some new things to learn too!
Below are some of "Work-in-progress" pics as i commence on the model. The pic below is the hull of the tank, with the roadwheel arms already added to both sides.
These are the roadwheels to be added on soon...Lotsa filing of the wheels to be done. Interesting thing is that on each side of the tank, there are like about 4 layers of wheels... See the other pics for more illustrations

The hull with the wheels added on...See what i mean by the 4 layers on each side?

Ok here comes the real challenging part... see the yellow areas. That's putty applied to the vertical surfaces of the vehicle. During WWII, this was the anti-magnetic paste that the Germans applied to their tanks to prevent the enemies from sticking bombs onto their tanks.
Took me several attempts & 2 trips to the model shops to get the correct tools to 1)apply the paste & 2)create the correct texturing on the surface of the paste...

More pics of the textured areas..This texturing is called zimmerit.

More close up views of the turret with zimmerit. Can see the patterns? Don't ask me y some areas are uneven or peeled off zimmerit. That was deliberate.


The gun mantlet with the zimmerit.
Phew!! Finally completed the zimmerit application.
Stay tuned for more updates

Cheers!
Brandon